
Pre-Recording Checklist for SLAM Scans #
☐ Data Management
- Offload all data and flights from the USB drive, erase all data, and format the USB drive to FAT32 using the GUI.
☐ Firmware Check
- Ensure that the RESEPI or EchoONE is running the latest firmware version. The firmware version can be found in the top right corner of the GUI.
☐ Map Out a Loop-Closure Route
- Identify a path that allows the scan to start and end in the same location, forming a full loop.
- Plan a logical route through the environment for even coverage.
☐ Limit Excessive Looping
- Loop closures should occur at key points but not excessively.
- Avoid looping around every small object or scene feature.
☐ Identify Areas of Concern
- Note regions with inclines, narrow hallways, or large open spaces that may affect SLAM performance.
- Plan brief angle adjustments only if needed for terrain changes.
☐ Ensure LiDAR Visibility
- Confirm that throughout the path, the LiDAR will have clear line-of-sight to structural features.
☐ Secure the RESEPI or EchoONE Unit
- Mount RESEPI or EchoONE firmly to the handheld SLAM kit using the designated bracket.
- Ensure cables are not strained and that LiDAR has clear, unobstructed view of the environment.
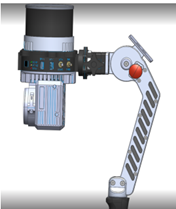
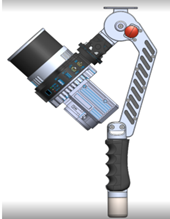
☐ Choose Mounting Configuration
- Standard Configuration (LiDAR flat/horizontal): Recommended for most indoor or level scans, shown below (left).
- Angled Configuration (LiDAR tilted): Use only when mapping long-term inclines or declines, shown below (right).
☐ Power Connection
- Connect RESEPI or EchoONE to power via one of the following:
- XT60
- Skyport/Other
- Binder Connector
- Ethernet (GEN-II only)
- Ensure power supply is 9–36VDC (up to 45V max) with 24–28W available.
☐ Insert USB Drive
- Use the provided USB drive formatted as FAT32.
- Confirm that the drive is securely inserted into the USB port for data logging.
☐ Attach GNSS Antenna (if applicable)
- Only applicable to those doing georeferenced SLAM scans.
☐ Power On the Device
- Press the Power Button to turn on RESEPIor EchoONE .
- Wait until the system has fully initialized (watch status LEDs or GUI load).
☐ Connect to RESEPI or EchoONE’s Wi-Fi
- SSID is printed on the unit label.
- Password: LidarAndINS
- Connect using a laptop, phone, or tablet.
☐ Open Web Interface
- Open a browser and go to: 192.168.12.1
☐ Configure SLAM Settings
- Within Status tab configure the SLAM Settings to Indoor or Outdoor
- Not a requirement, as this can be adjusted in post processing
☐ Set IMU Orientation Based on Configuration
- Go to: Settings > Geometry > Vehicle to IMU Rotation
- Click Save
☐ Set “Record Without GNSS”
- For GNSS denied SLAM, enable “Record Without GNSS”
- For georeferenced SLAM, disable “Record Without GNSS”
☐ Enable Interstitial Points Filtering (Optional)
- For scanning in metallic/structured areas (e.g. stadiums, HVAC, temporary structures), go to Settings > LiDAR Service
- Enable “Interstitial Points Filtering” to reduce stray points.
☐ Start in a GNSS-Friendly Area (if applicable)
- If doing georeferenced SLAM, begin the mission outdoors with open sky and minimal obstructions near the GNSS antenna.
☐ Wait for Time Fix (if applicable)
- For GEN-II devices or georeferenced scans, in the Web GUI, check the INS Status window.
- Confirm that:
- Date/time are correct
- Status message reads: “Ready to log”
☐ Confirm Drive has Sufficient Space
- Offload any previous data and format if needed.
- RESEPI or EchoONE will write new scan data to the drive once logging starts.
- Avoid using a drive that is nearly full.
☐ Ensure All Cables are Secure
- Power, antenna, and data cables should be fully seated and strain-relieved.
☐ Stabilize the Unit for IMU Initialization
- Be prepared to hold RESEPI or EchoONE still for ~10 seconds immediately before pressing “Start”.
Prefer a printable version? Click the link below to download the checklist as a PDF. Great for offline use or keeping a hard copy in the field.