

360 Camera Mission Step-by-Step #
This guide shows how to collect data with the GoPro MAX 2 360 camera and add color to your point cloud in PCMasterPro, from the field to the colorized LAS file. It applies to both mobile mapping (MMS) and SLAM scans: the RESEPI payload is set up and recorded as described in the RESEPI SOP for Capturing MMS Scans or the RESEPI SOP for Capturing SLAM Scans, and this guide covers the camera and the 360 camera software workflow. It does not cover LiDAR processing.
Before you start: Make sure a calibration for the 360 camera has been uploaded to the payload.
1. Preparing the Equipment #
- Attach the GoPro MAX 2 to the scanner mount (see the 360 Camera Mounting for MMS or 360 Camera Mounting for SLAM guide).
- Make sure the battery is full and the memory card has enough space.
- Set these options on the camera touchscreen:
-
- Camera Mode: 360. The camera saves a
.360file. - Orientation: All.
- Camera Mode: 360. The camera saves a
- Profile: Standard.
- Resolution: 5.6K.
- Frame Rate: 30 fps.
- QuikCapture: Off.
- Scheduled Capture: Off.
- Duration: Off.
- Timer: Off.
- GPS: On. The software uses the camera GPS time to help match the camera clock to the scanner clock.
-
- Wait for the camera to get a GPS fix before you record. The GPS position icon at the top left of the touchscreen is blue when the camera has a fix.
- Check the camera date and time. They must be correct.
- In the payload web-GUI, confirm the boresight calibration is loaded: Settings > Camera should show an entry for gopro-mms (MMS) or gopro-slam (SLAM). If it is missing or needs updating, load it with “Read from PCMasterPro .pcpp File”. The calibration stays on the payload until it is overwritten by another calibration.
2. Recording the Data #
- Start the camera recording first.
- Start the RESEPI recording, as described in the MMS or SLAM Mission Step-by-Step.
- Collect your data. Keep the camera lens clean and unobstructed.
- Stop the RESEPI recording.
- Stop the camera recording only after the RESEPI recording has stopped.
- Keep the operator’s body out of the lower part of the image where possible.
- Do not change camera settings between scans of the same project.
3. Preparing the Project Folder #
- Copy the
.360file to the same folder as yourppk.pcmporslam.pcmpfile. - Make sure the IMU
.imrfile is available in the/insfolder. The project file contains its path. - Do not rename the project files.
my_project/
├── ppk.pcmp   (or slam.pcmp)
├── GS010001.360
└── ins/       (scanner IMU data)
4. Loading and Synchronizing the 360 Images #
- Open your
ppk.pcmporslam.pcmpproject in PCMasterPro. - In the Data Selection ribbon, click Load 360 Images (Imaging group).

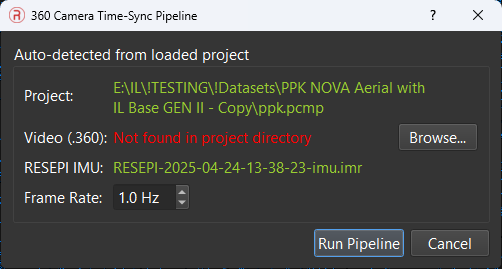
- The 360 Camera Time-Sync Pipeline window opens.
- Check the Auto-detected from loaded project section:
- Video (.360): The software finds the
.360file in the project folder. - RESEPI IMU: The software reads the IMU path from the project file. A binary
.imrfile is converted automatically to a text file next to it. - If a file shows red text, click Browse… and select the file.
- Video (.360): The software finds the
- Set the Frame Rate. This is the number of images the software extracts each second of scan time (default 1.0 Hz).
- 1 Hz at 10 m/s gives one image every 10 m.
- 2 Hz gives one image every 5 m.
- A higher rate gives more image overlap but uses more time and disk space.
- Click Run Pipeline.
- Watch the progress bar and the status panel. The pipeline does these tasks:
- It matches the camera motion data to the scanner motion data. This gives the time offset.
- It extracts images (
gopro_*.jpg) from the video at the scanner timestamps and stitches them into equirectangular frames. - It writes the project photo file with the time offset and camera settings.
- When the pipeline finishes, the software loads the photos automatically.
Check the result
- The status panel shows the number of images loaded.
- The status panel also reports which boresight calibration was used, for example “Using gopro-mms boresight calibration” or “Using gopro-slam boresight calibration”. If it reports that no calibration was found, PCMasterPro continued with default values. Make sure the calibration is uploaded to the payload before recording (see the calibration step in Preparing the Equipment).
- If no photos load, see Troubleshooting below.
5. Checking the Alignment #
- Look at the colored point cloud next to the images.
- Look for “ghosting” (double edges) on buildings and poles.
- If the alignment is good, go to Exporting the Colorized Point Cloud.
- If you see ghosting, go to Refining the Camera Calibration.
6. Refining the Camera Calibration (If Needed) #
- In the Calibration ribbon, select the 360 camera (
gopro) in Camera Tools for:, then click Camera Calibration to see the current values:- Linear X/Y/Z: camera position relative to the scanner, in meters.
- Yaw/Pitch/Roll: camera rotation relative to the scanner, in degrees.
- Nadir Mask (deg): the software ignores image pixels below this latitude. Use it to hide the operator and the scanner.
- Lens Yaw Bias (deg) and Colorization Range (m): see Camera Calibration in the PCMasterPro Toolbar Menu Items Breakdown.

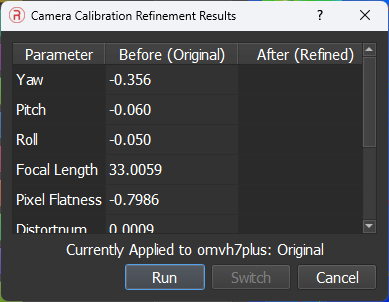
- Click Refine Calibration to open the refinement window, then click Run to run the optimizer.
- Compare the Before (Original) and After (Refined) values. For 360° cameras the results table shows H Scale and V Scale and a Colorization Consistency score. Use Switch to change between the original and refined values and check the alignment.
- Keep the refined values only if the alignment improves.
Tips
- The optimizer needs scenes with many fixed features. It can fail on open sky or featureless areas.
- Do not change the system orientation values for 360° projects. Keep them at 0, 0, 0.
- The angular values stay stable between datasets with the same mount.
7. Exporting the Colorized Point Cloud #
- Go to File > Export LAS File(s).
- Set Export Colorized to Colorize. (Select No Color to export without color.)
- Set the Nadir Mask (deg) value in Camera Calibration if you have not done so.
- Set the remaining export options and formats, then click Export.
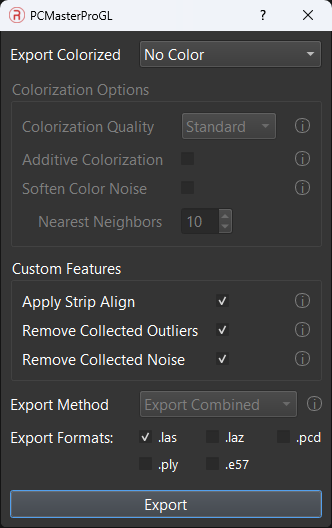
- PCMasterPro projects each point into the nearby 360° images and blends the colors from many images.
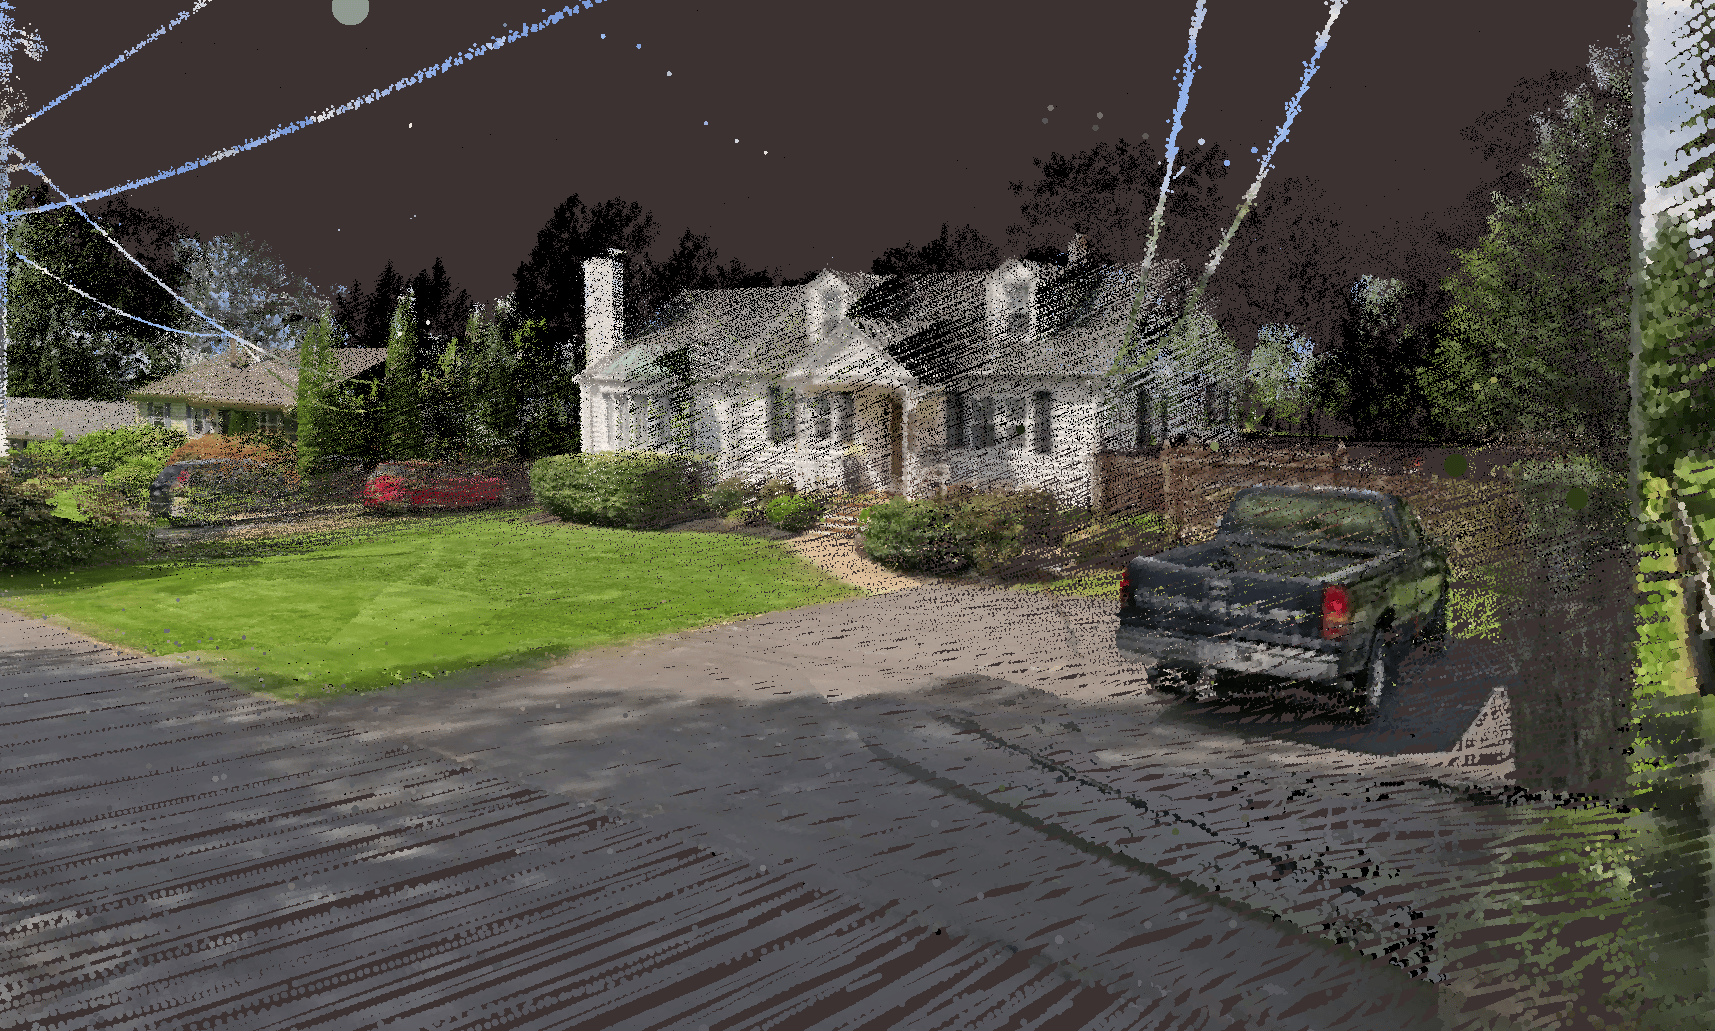
- The software writes a colored LAS file.
- Open the LAS file in your viewer and check the colors.
Note: Colorized export from a SLAM project requires the project to have been captured with the 360° camera.
Troubleshooting #
| Symptom | Likely cause | Action |
|---|---|---|
| “No Project Loaded” message | No project is open | Open ppk.pcmp or slam.pcmp, then click Load 360 Images again. |
| Video or IMU shows red text | File not in the project folder, or path wrong | Click Browse… and select the file. |
| “No synchronized_timestamps.csv loaded” | The time-sync stage did not finish | Run the pipeline again. Check the status panel for errors. |
| Photos extracted but 0 photos loaded | Photo timestamps are outside the trajectory time range | Check that the time offset is correct and that the video covers the scan. The camera must start recording before the RESEPI and stop after it. |
| Status panel reports no gopro-mms or gopro-slam calibration found | The calibration was not uploaded to the payload when the dataset was recorded | Upload it in the payload web-GUI under Settings > Camera with “Read from PCMasterPro .pcpp File” before recording the next dataset. |
| Ghosting in the colored cloud | Wrong time offset or boresight values | Refine the camera calibration. Check the time offset. |
| Black areas under the trajectory | Nadir mask hides too much, or image spacing is too wide | Reduce the nadir mask angle or increase the frame rate. |
| Refinement changes nothing | Too few visible features | Use a scene with buildings or road markings. |